Students are given a study guide for the Arc Welder. After passing the written and practical test with 100 percent they may use the welder to make practice welds. Three welds, (Straight bead, Butt, and Lap) must be turned in for a grade.
Evaluation:
1 point for cleaning of welds prior to turning in
3 points for each weld based on the quality of the weld including:
10 Points Total

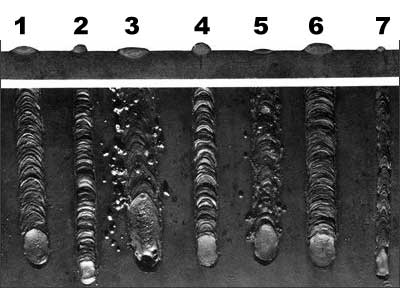
Seen from above and in cross section, the seven beads in this photograph show the effects of the three major components of arc-welding technique: current setting, arc length, and electrode speed.
The smooth, even ripples in the first example (1) at the left indicate a good bead. You can see equal amounts of weld metal above and below the surface of the work.
The next two beads (2 and 3) show the effects of incorrect amperage. First (2), because the current was too low, the bead failed to penetrate. Then (3), too much current made the weld crater too large and spattered.
In (4) and (5) beads, the welder misjudged the electrode's distance from the work. Too short an arc (4) left a superficial bead. Too long an arc (5) made a shallow, spattered bead.
The last two beads illustrate the importance of the rate at which you move the electrode along the workpiece. Too slow a movement (6) left excessive waste metal, and too much speed (7) created a shallow, elongated bead.

