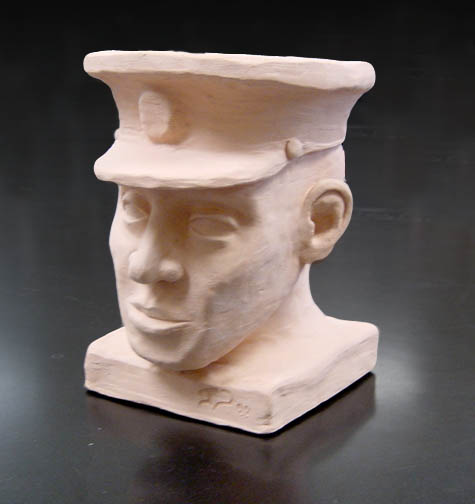
Head Sculpting

The videos below illustrate the steps students go through in making their clay portrait busts at Litchfield High School.
This is the most intensive assignment we do in Ceramics class. It can take up to 3 weeks to complete.

Videos require Quicktime Player. Download Quicktime here.

Scroll down for a written description of the process.

(These are large files, 35-55 Mb each)


1. Head and Eyes

2. Mouth and Nose

3. Chin and Brow

4. Ear and Hair


Evaluation:
Realistic Proportions: 5 pts.
Eyes: 2 pts.
Mouth: 2 pts.
Nose: 2 pts.
Ear: 2 pts.
Hair: 2 pts.
Base integrated nicely: 2 pts.
Hollowed out correctly: 3 pts.
20 points total


Head Sculpting Process Description:

1. Pound/squish/smoosh/move clay to form a general head shape.

2. Construct the "planes" of the head"

3. Rule out the vertical center line and Horizontal center line

4. Press the eye sockets in along the horizontal center line with your thumbs

5. Rule out mouth line halfway between bottom of chin and eyeline

6. Make two small slabs about pencil/pinkey thickness and attach them on top and bottom of mouth line, making sure the top angles down like a roof and the bottom angles up

7. Shape the top lip with two thumbs and blend the lips into the face

8. Make a triangle for the nose and attach that along the vertical center line of the face. 9. Add nostrils by rolling two balls of clay and attaching them to the nose triangle, blending them into the front of the nose.

10. Roll out a slab for the cheek bones. Add that slab under and around the eye socket and a little down the side of the cheek.

11. Roll out a slab for the chin and jaw. Attach that and smooth it in to the face.

12. Roll a ball for the eyes and place it in the eye socket space.

13. Roll coils for the eyelids and point them out on one edge so they look like a teardrop shape if you cut them into a cross-section.

14. Use your pencil tool to blend the top and bottom lids into the eye socket. Remember that there's a sharp edge/fold where the top lid meets the eye socket while the bottom lid blends into the face smoothly.

15. Push the eye balls back and add clay to fill in the spaces between the lids and eyeballs.

16. Construct a slab in a half-heart shape for the ear. Attach that behind the center line of the head in profile and smooth that forward into the cheek/face.

17. Add a coil of clay behind the ear and blend that into the head and ear.

18. Sculpt the ear to look right. (Can't describe that in words, just gotta look and see and observe and try and try again.)

19. Use large slabs of clay to indicate the masses of the hair.

20. Cut/smooth/groove out the hair to indicate random waves/curles/sections of hair. Be sure to push the lines in the direction the hair is combed.

21. When leather hard on the outside hollowing may begin. Cut a pie shape out of the back of the head and use a ribbon tool to cut away all the soft clay inside until there's a consistent 1/4-1/2 inch thickness throughout the bust.

22. Use the ribbon tool and hollow out the pie shaped piece of the back of the head you cut out.

23. Use a needle tool to poke holes all over the inside of both pieces of the head to vent any air bubbles that may be lurking inside the clay. This vents the air and also weakens the back so if there still is an air pocket it will break out the back/inside instead of out the front of the face.

24. Scratch and attach the back pie shape to head again and repair the seam so it's not visible.

25. finish the base and let it dry slowly so as to minimize cracking, then fire and paint/glaze/patina to the desired color.